Autoscaling and Concurrency
Unlike CPU workloads, GPU workloads can currently only process one task at a time. If you’re running workloads on a GPU, your tasks are going to be processed one-by-one unless autoscaling is enabled.
Autoscaling
can be passed as an argument to REST APIs or Task Queues.
Autoscaling is a premium feature, available to users on the Team or Growth plan.
Scaling out horizontally (adding more containers)
When you deploy a Task Queue or REST API, Beam creates a queueing system that manages each task that’s created when your API is called.
You can configure how Beam will scale based on how many things are in the task queue (queue depth) or how quickly to process a task in the queue (request latency).
If you aren’t sure which strategy to use, we suggest starting with QueueDepthAutoscaler
.
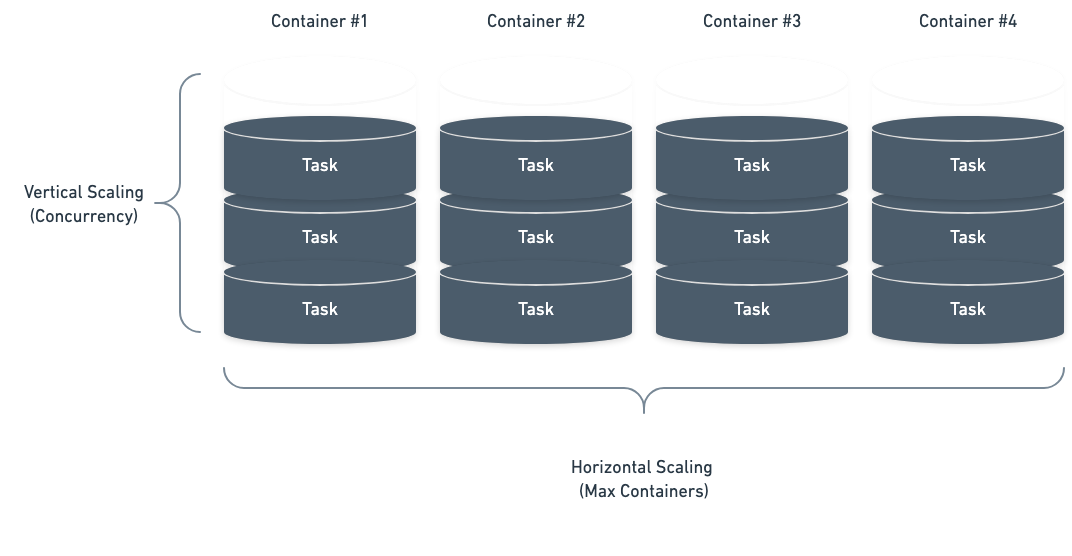
Scale by Queue Depth
Our simplest autoscaling strategy allows you to scale by the number of tasks in the queue.
This allows you to control how many tasks each replica can process before scaling up. For example, you could setup an autoscaler to run 30 tasks per replica. When you pass 30 tasks in your queue, we will add a replica. When you pass 60, we’ll add another replicas (up until the max_replicas setting).
from beam import QueueDepthAutoscaler
autoscaling_config = QueueDepthAutoscaler(
max_tasks_per_replica=30,
max_replicas=3,
)
@app.rest_api(autoscaler=autoscaling_config)
def your_function():
...
Scale by Request Latency
We also offer a more advanced autoscaling strategy called MaxRequestLatency
. This allows you to scale based on the length of time you’d like to wait before a request starts processing.
For example, if you want your app to process each incoming request in under 30 seconds, you can set a desired_latency
of 30. Beam will spin up additional resources when (average time per task) * (queue size)
exceeds 30 seconds.
from beam import RequestLatencyAutoscaler
autoscaler = RequestLatencyAutoscaler(desired_latency=30)
@app.rest_api(autoscaler=autoscaler)
def your_function():
...
It’s important to note that max_replicas
will always be prioritized over desired_latency
. If the replica limit is reached, your API will continue running but some requests will take longer than the desired_latency
you’ve set.
from beam import RequestLatencyAutoscaler
autoscaler = RequestLatencyAutoscaler(
desired_latency=30,
max_replicas=5
)
Real-World Examples
Max Request Latency
Let’s say you’ve deployed a Task Queue with a MaxRequestLatency
autoscaler. You’ve configured it to scale up to 5 replicas if your request latency exceeds 30 seconds.
from beam import App, Runtime, Image, Volume, RequestLatencyAutoscaler
app = App(
name="model-training",
runtime=Runtime(
gpu="A10G",
cpu=1,
memory="4Gi",
image=Image(
python_version="python3.8",
python_packages="requirements.txt",
),
commands=['apt-get update', 'apt-get install -y libgomp1']
),
)
# Deploys function as async task queue
@app.task_queue(autoscaler=RequestLatencyAutoscaler(
desired_latency=30,
max_replicas=5
)
)
def train():
...
Here’s an example scenario:
- You start with a single GPU replica.
- You get 3 simultaneous requests to your API.
- Each GPU can only process a single task at a time, and each take 1 minute to run.
- Because you’ve added an Autoscaling rule with a
desired_latency
of 30 seconds, Beam spins up 3 GPU replicas to run these requests on parallel GPUs.
If you didn’t have autoscaling enabled, these tasks would run one-by-one, and take a total of (1+1+1)
minutes to run.
With autoscaling, the tasks run on 3 parallel machines, so all 3 task are completed in 1 minute.
Queue Depth
Suppose you have a task queue where each task takes 10 seconds to process.
from beam import App, Runtime, QueueDepthAutoscaler
app = App(name="model-training", runtime=Runtime())
@app.task_queue(
autoscaler=QueueDepthAutoscaler(max_tasks_per_replica=3, max_replicas=3),
)
def my_task_queue():
import time
time.sleep(10.0)
print("I'm done!")
Here’s how this would autoscale:
- After we have a backlog of >3 tasks, we add a replica (up to 3 replicas).
- If you have >= 3 tasks in the queue, you can expect it to take up to 30 seconds for that 3rd task to process.
Increasing throughput in a single container
You can increase throughput for your workloads by configuring the number of workers to launch per container. For example, if you have 4 workers on 1 container, you can run 4 tasks at once.
Workers are especially useful for CPU workloads, since you can increase throughput by adding workers and additional CPU cores, rather than using autoscaling to additional replicas.
from beam import App, Runtime, Image
app = App(
name="high-throughput-app",
runtime=Runtime(
cpu=5, # Each worker runs on its own CPU core
memory="8Gi",
image=Image(),
),
)
# Launch on 5 workers per container to increase throughput
@app.rest_api(workers=5)
def predict():
# These workloads will share compute resources with each other
...
Workers are always orchestrated together. When the container launches, all the workers launch.
This can result in higher throughput than using multiple containers with horizontal autoscaling.
Worker Use-Cases
Workers allow you to increase your per container throughput, vertically. Autoscaling allows to scale the number of containers and increase throughput horizontally
Each worker will share the CPU, Memory, and GPU defined in your app. This means that you’ll usually need to increase these values in order to utilize more workers.
For example, let’s say your model use 3Gi of GPU memory, and your app is deployed on a T4 GPU with 16Gi of GPU memory. You can safely deploy with 4 workers, since those will fit within the 16Gi of GPU memory available.
It’s not always possible to fit multiple workers onto a single machine. In order to use workers effectively, you’ll need to know how much compute is consumed by your task.
When you’ve added multiple workers, you’ll be able to see each time a new worker is started in your logs:

Was this page helpful?