In this example we are fine-tuning Gemma 2B, an open source model from Google.

View the Code

See the code for this example on Github.

Fine-Tuning

In this example, we are using Low-Rank Adaption (LoRA) to fine-tune the Gemma language model using the Open Assistant dataset.

The goal is to use this dataset to improve Gemma’s ability to engage in helpful conversations, making it more suitable for assistant-like apps.

LoRA

You can read more about LoRA here. However, let’s briefly discuss what exactly it does and why we chose to use it here.

At a high level, LoRA introduces a new small set of weights to the model that we will be training. By limiting our training to these additional weights, we can fine-tune the model much quicker. Additionally, since we are not touching the original weights, the model’s initial knowledge base should intact.

Initial Setup

In this example, we are using an A100-40 GPU. We are using mixed precision (FP16) to optimize for speed and memory usage. In this example, we are only training for one epoch. In practice, you can probably train longer and continue to see improved results.

No surprise here, but we are getting our compute via Beam. We are using the function decorator so that we can run our fine-tuning application as if it were on our local machine.

from beam import Volume, Image, function


# The mount path is the location on the beam volume with the model weights
MOUNT_PATH = "./gemma-ft"
@function(
    volumes=[Volume(name="gemma-ft", mount_path=MOUNT_PATH)],
    image=Image(
        python_packages=["transformers", "torch", "datasets", "peft", "bitsandbytes"]
    ),
    gpu="A100-40",
    cpu=4,
)

Mounting Storage Volumes

We’re using Beam’s persistent storage volumes to store model weights and training data. This allows us to download the necessary files directly to the volume, streamlining the setup process.

Here’s a simple script to handle the downloads:

from beam import function, Volume, Image, env

if env.is_remote():
    from huggingface_hub import snapshot_download
    from datasets import load_dataset

VOLUME_PATH = "./gemma-ft"

@function(
    image=Image(python_version="python3.11")
    .add_python_packages(
        [
            "huggingface_hub",
            "datasets"
            "huggingface_hub[hf-transfer]",
        ]
    )
    .with_envs("HF_HUB_ENABLE_HF_TRANSFER=1"),
    memory="32Gi",
    cpu=4,
    secrets=["HF_TOKEN"],
    volumes=[Volume(name="gemma-ft", mount_path=VOLUME_PATH)],
)
def upload():
    snapshot_download(
        repo_id="google/gemma-2b",
        local_dir=f"{VOLUME_PATH}/weights"
    )
         
    dataset = load_dataset("OpenAssistant/oasst1", split="train")
    dataset.save_to_disk(f"{VOLUME_PATH}/data")
    print("Files uploaded successfully")

if __name__ == "__main__":
    upload()

This script will download the Gemma 2B model weights and the Open Assistant dataset directly to your Beam volume.

First, let’s create our volume:

beam volume create gemma-ft

Next, we can run our script to populate it with the model and dataset:

python upload.py

Once those uploads are complete, we can move on to training.

Start Training

We can start our training by running python finetune.py. After beginning training, you should see something like the following in your terminal:

=> Building image
=> Syncing files
...
=> Running function: <finetune:gemma_fine_tune>
Loading checkpoint shards:   0%|          | 0/3 [00:00<?, ?it/s]
...
Generating train split: 12947 examples [00:00, 114393.80 examples/s]
...
Map:  93%|#########2| 12000/12947 [00:13<00:01, 921.12 examples/s]
...
  1%|          | 6/809 [00:08<16:35,  1.24s/it]
...
{'loss': 1.617, 'grad_norm': 0.4805833399295807, 'learning_rate': 0.00019752781211372064, 'epoch': 0.01}
...

Once it is finished, we can use the beam CLI to look at the resulting files. You should see something like this:

❯ beam ls gemma-ft/gemma-2b-finetuned

  Name                                                Size   Modified Time   IsDir
 ──────────────────────────────────────────────────────────────────────────────────
  gemma-2b-finetuned/README.md                    4.97 KiB   Aug 10 2024     No
  gemma-2b-finetuned/adapter_config.json          644.00 B   Aug 10 2024     No
  gemma-2b-finetuned/adapter_model.safetensors   12.20 MiB   Aug 10 2024     No
  gemma-2b-finetuned/checkpoint-700              36.70 MiB   Aug 01 2024     Yes
  gemma-2b-finetuned/checkpoint-800              36.70 MiB   Aug 01 2024     Yes
  gemma-2b-finetuned/checkpoint-809              36.70 MiB   Aug 01 2024     Yes
  gemma-2b-finetuned/special_tokens_map.json      555.00 B   Aug 10 2024     No
  gemma-2b-finetuned/tokenizer.json              16.71 MiB   Aug 10 2024     No
  gemma-2b-finetuned/tokenizer_config.json       45.21 KiB   Aug 10 2024     No

  9 items | 139.06 MiB used

Inference

In inference.py, we are loading up our model with the additional fine-tuned weights and setting up an endpoint to send it requests.

Here, we make use of the Beam’s on_start functionality so that we only load the model when the container starts instead of every time we receive a request. Let’s explore the endpoint decorator below.

from beam import Volume, Image, endpoint


# The mount path is the location on the beam volume with the model weights
MOUNT_PATH = "./gemma-ft"
@endpoint(
    name="gemma-inference",
    on_start=load_finetuned_model,
    volumes=[Volume(name="gemma-ft", mount_path=MOUNT_PATH)],
    cpu=1,
    memory="16Gi",
    gpu="T4",
    image=Image(
        python_version="python3.9",
        python_packages=["transformers==4.42.0", "torch", "peft"],
    ),
)

Once again, we are mounting our storage volume named “gemma-ft”. Since we have already run training, this volume will now contain our fine-tuned weights alongside the base weights we got from Hugging Face.

Choosing a GPU For Inference

Now that we’ve trained the model, we can run it on a machine with a weaker GPU.

Training requires more memory than inference because it must store gradients and optimizer states for all parameters, in addition to activations, whereas inference only needs to maintain the current layer’s activations during a forward pass. Be sure to keep this in mind as you work on your own applications.

You can use the Beam dashboard to get a sense of GPU utilization in real-time. With this information, you can make a more informed choice about how much compute you require. For this example, we use a T4 GPU. It has 16GB of VRAM and is a good choice for inference with a model this small.
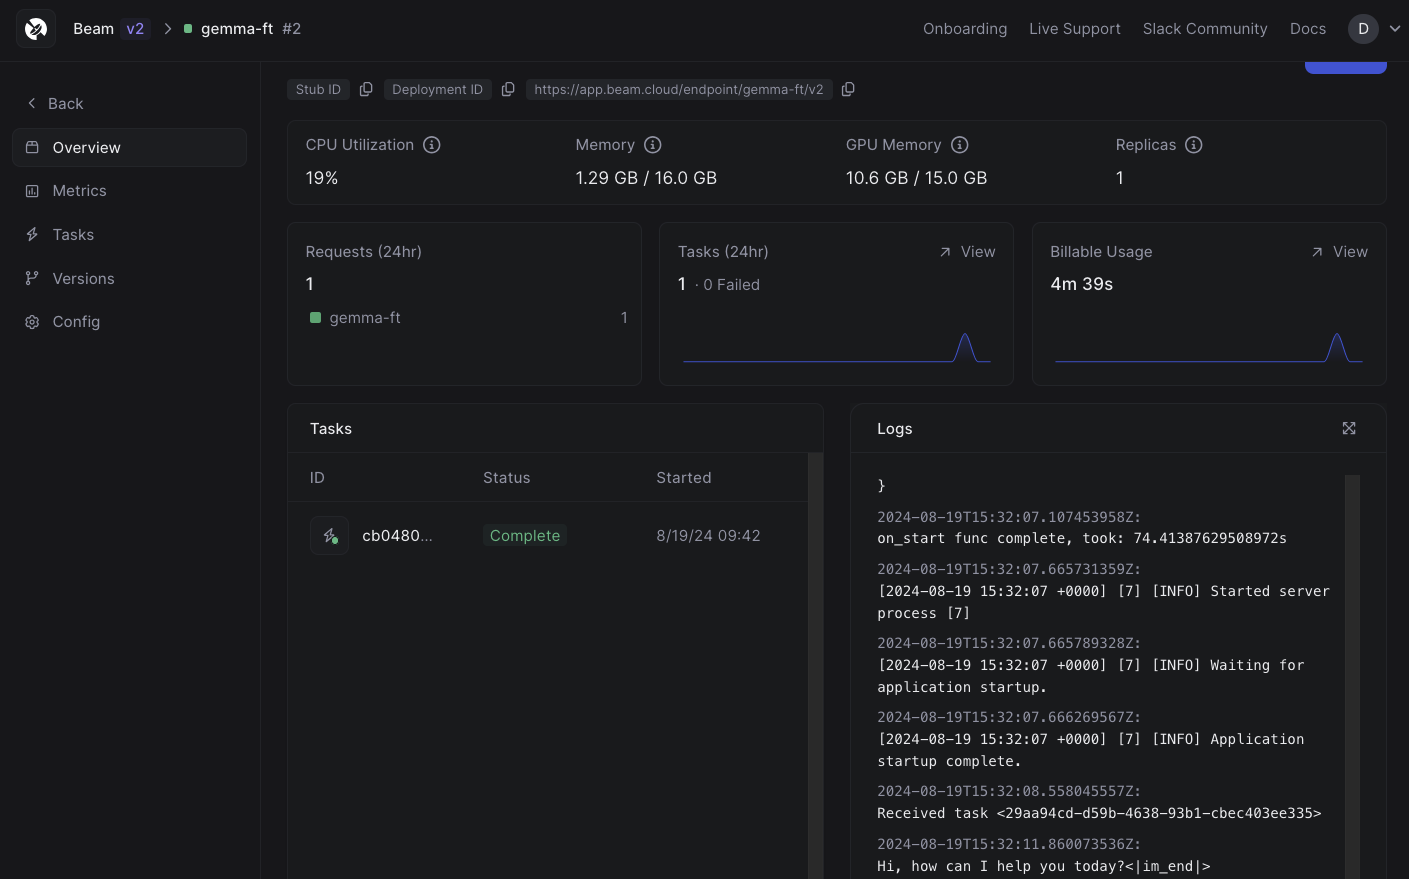
Monitoring compute usage in real-time in the dashboard

Using Signals to Reload Model Weights Automatically

We use a Signal abstraction to fire an event to the inference app when the model has finished training.

This allows us to communicate between apps on Beam. In this example, we have it setup to re-run our on-start method when a signal is received. This way, if we re-train our model, we can load the newest weights without restarting the container.

# Register a signal
s = experimental.Signal(
    name="reload-model",
    handler=load_finetuned_model,
)

Deploying The Endpoint

Let’s deploy our endpoint! We can do this with the beam CLI.

beam deploy inference.py:predict --name gemma-ft

The output will look something like this:

=> Building image
=> Syncing files
=> Deploying
=> Deployed 🎉
=> Invocation details
curl -X POST 'https://app.beam.cloud/endpoint/gemma-ft/v2' \
-H 'Connection: keep-alive' \
-H 'Content-Type: application/json' \
-H 'Authorization: Bearer {YOUR_AUTH_TOKEN}' \
-d '{}'

When calling our inference endpoint, we’ll need to include a prompt. For example, we can call the deployed endpoint with -d '{"prompt": "hi"}. The response we get back will be in the following format:

{"text":"Hello! How can I help you today?<|im_end|>"}

Note that the returned response includes the stop tokens <|im_end|>. You could strip this token in the endpoint logic if you would like, but it is worth keeping around if you will be appending this response to a longer running conversation.