> ## Documentation Index
> Fetch the complete documentation index at: https://docs.beam.cloud/llms.txt
> Use this file to discover all available pages before exploring further.
# Connecting an S3 Bucket
This example illustrates a few capabilities of Beam:
* [Secrets Management](/v2/environment/secrets)
* [Storage Volumes](/v2/data/volume)
* [Scheduled Cron Jobs](/v2/function/scheduled-job)
### Customize the runtime
First, you'll define a [`Runtime`](/v2/reference/py-sdk) with an [`Image`](/v2/reference/py-sdk#image).
We're going to be defining two things:
* Which packages to install in the runtime
* A storage volume to temporarily store images downloaded from S3
```python app.py theme={null}
from beam import App, Runtime, Image, Volume
app = App(
name="s3-background-remover",
runtime=Runtime(
cpu=1,
memory="16Gi",
image=Image(
python_version="python3.8",
python_packages=["pillow", "rembg", "boto3"],
),
),
volumes=[Volume(path="./unprocessed_images", name="unprocessed_images")],
)
```
### Storing AWS secrets
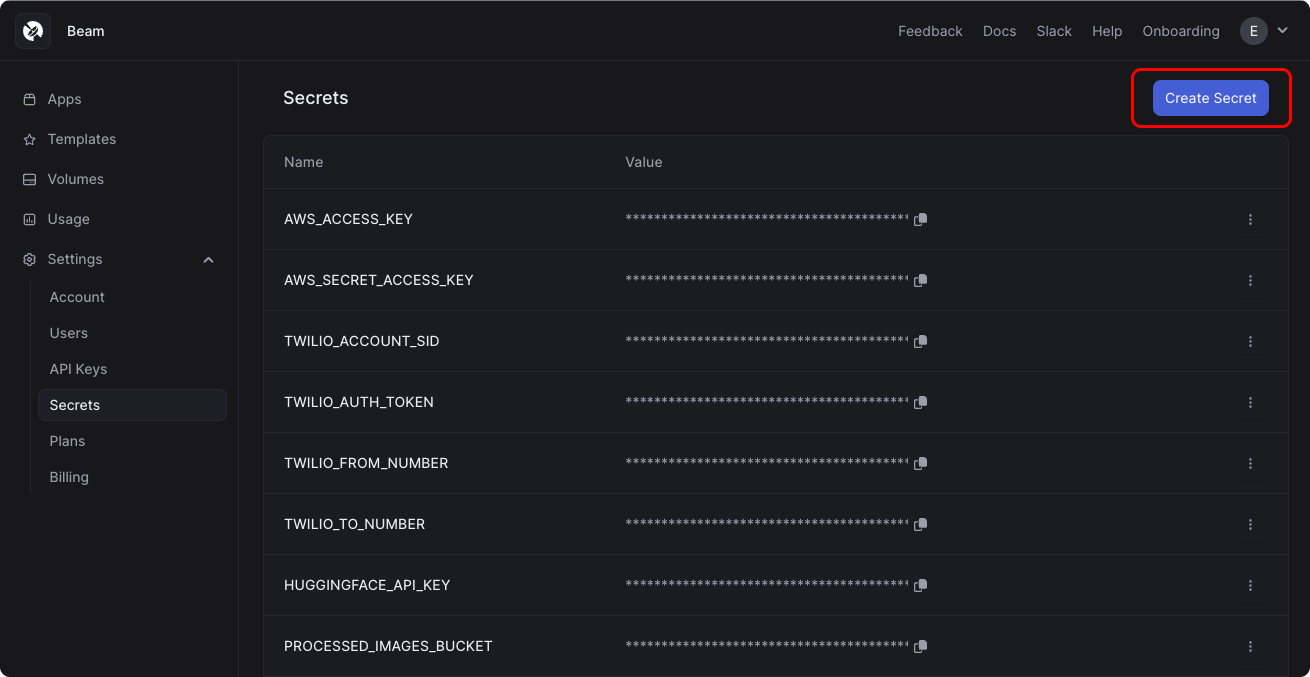
Since we're pulling image files from Amazon S3, you'll need your own AWS credentials to run this example. You can save your AWS credentials in the [Beam Secrets Manager](/v2/environment/secrets), and access the secrets as `os.environ` variables.
 ```python theme={null}
os.environ["AWS_ACCESS_KEY"]
os.environ["AWS_SECRET_ACCESS_KEY"]
```
### Reading and writing files from S3
Let's write a basic client to read and write files to an S3 bucket. You'll setup a dedicated bucket for images that are unprocessed, and another bucket for finished images.
```python run.py theme={null}
import os
import boto3
class Boto3Client:
def __init__(self):
self.boto3_client = boto3.session.Session(
aws_access_key_id=os.environ["AWS_ACCESS_KEY"],
aws_secret_access_key=os.environ["AWS_SECRET_ACCESS_KEY"],
region_name="us-east-1",
)
def download_from_s3(self, bucket_name, download_path):
s3_client = self.boto3_client.resource("s3").Bucket(bucket_name)
for s3_object in s3_client.objects.all():
filename = os.path.split(s3_object.key)
s3_client.download_file(s3_object.key, f"{download_path}/{filename}")
def upload_to_s3(self, bucket_name, file_body, key):
s3_client = self.boto3_client.resource("s3").Bucket(bucket_name)
s3_client.put_object(Body=file_body, Key=key)
```
### Processing images with rembg
We'll use [`rembg`](https://github.com/danielgatis/rembg) to remove the backgrounds from our images.
Let's write a function to:
* Download all the files in your bucket to a [Storage Volume](/v2/data/volume)
* Apply the background removal process to each image with `rembg`
* Upload the each processed image to an S3 bucket
```python run.py theme={null}
import os
import io
import boto3
from PIL import Image
from rembg import remove
def process_images():
client = Boto3Client()
# Download S3 files to a storage volume
client.download_from_s3(
bucket_name=os.environ["UNPROCESSED_IMAGES_BUCKET"],
download_path="./unprocessed_images",
)
for f in os.listdir("./unprocessed_images"):
with open(f"./unprocessed_images/{f}", "rb") as file:
img = Image.open(file)
output = remove(img)
name = os.path.splitext(f)[0]
# Convert image to bytes
img_in_bytes = io.BytesIO()
output.save(img_in_bytes, format="PNG")
# Write back to S3 bucket
client.upload_to_s3(
bucket_name=os.environ["PROCESSED_IMAGES_BUCKET"],
file_body=img_in_bytes.getvalue(),
key=f"{name}.png",
)
```
### Running the function on a schedule
Since we want this to run on a schedule, we'll add a [Scheduled Job](/v2/function/scheduled-job) to the Beam app.
```python app.py theme={null}
@app.schedule(when="every 5m")
```
### Deploying the app
To deploy the app, enter your shell from the working directory and run:
```bash theme={null}
beam deploy app.py
```
After you run this command, your app will run every hour, indefinitely.
You can modify the frequency by updating the cron interval and redeploying the app. And if you decide that you'd rather invoke this manually as a REST API, [you can do that too](/v2/endpoint/overview).
```python theme={null}
os.environ["AWS_ACCESS_KEY"]
os.environ["AWS_SECRET_ACCESS_KEY"]
```
### Reading and writing files from S3
Let's write a basic client to read and write files to an S3 bucket. You'll setup a dedicated bucket for images that are unprocessed, and another bucket for finished images.
```python run.py theme={null}
import os
import boto3
class Boto3Client:
def __init__(self):
self.boto3_client = boto3.session.Session(
aws_access_key_id=os.environ["AWS_ACCESS_KEY"],
aws_secret_access_key=os.environ["AWS_SECRET_ACCESS_KEY"],
region_name="us-east-1",
)
def download_from_s3(self, bucket_name, download_path):
s3_client = self.boto3_client.resource("s3").Bucket(bucket_name)
for s3_object in s3_client.objects.all():
filename = os.path.split(s3_object.key)
s3_client.download_file(s3_object.key, f"{download_path}/{filename}")
def upload_to_s3(self, bucket_name, file_body, key):
s3_client = self.boto3_client.resource("s3").Bucket(bucket_name)
s3_client.put_object(Body=file_body, Key=key)
```
### Processing images with rembg
We'll use [`rembg`](https://github.com/danielgatis/rembg) to remove the backgrounds from our images.
Let's write a function to:
* Download all the files in your bucket to a [Storage Volume](/v2/data/volume)
* Apply the background removal process to each image with `rembg`
* Upload the each processed image to an S3 bucket
```python run.py theme={null}
import os
import io
import boto3
from PIL import Image
from rembg import remove
def process_images():
client = Boto3Client()
# Download S3 files to a storage volume
client.download_from_s3(
bucket_name=os.environ["UNPROCESSED_IMAGES_BUCKET"],
download_path="./unprocessed_images",
)
for f in os.listdir("./unprocessed_images"):
with open(f"./unprocessed_images/{f}", "rb") as file:
img = Image.open(file)
output = remove(img)
name = os.path.splitext(f)[0]
# Convert image to bytes
img_in_bytes = io.BytesIO()
output.save(img_in_bytes, format="PNG")
# Write back to S3 bucket
client.upload_to_s3(
bucket_name=os.environ["PROCESSED_IMAGES_BUCKET"],
file_body=img_in_bytes.getvalue(),
key=f"{name}.png",
)
```
### Running the function on a schedule
Since we want this to run on a schedule, we'll add a [Scheduled Job](/v2/function/scheduled-job) to the Beam app.
```python app.py theme={null}
@app.schedule(when="every 5m")
```
### Deploying the app
To deploy the app, enter your shell from the working directory and run:
```bash theme={null}
beam deploy app.py
```
After you run this command, your app will run every hour, indefinitely.
You can modify the frequency by updating the cron interval and redeploying the app. And if you decide that you'd rather invoke this manually as a REST API, [you can do that too](/v2/endpoint/overview).